Monday, 28 December 2020

Lead Merge Using Batch Class

 Hello! ðŸ™‚

So I am excited to share a way to merge your existing duplicate leads of database using Batch class

Here are baby steps:

Steps 1: Write a Batch Class as shown below in Git Repo

Lead Merge Batch Git Repo


Step 2: Open Anonymous Window in Developer Console and run below command

LeadMergeBatch a = new LeadMergeBatch();

Database.executeBatch(a);


Step 3: Click Execute 

Now you can see lead having total 3 duplicates are merged automatically by running this batch class in your Salesforce Org


Hope you find this helpful ðŸ™‚
Thank you for being an awesome reader! Subscribe this blog for receiving all the latest updates

Sunday, 12 July 2020

Flow to Delete a Child Record

Hello Folks,

Hope everyone is staying safe.

In this Blog, we are Going to Learn How to create a flow to delete a Child record.
Lets understand the usecase and Implement it-


Usecase- Adam is the Account Owner of Account "Apextips" and he is observing that there are many associated Contacts records having Lastname as "Test" or something  a common name which he don't want to get  shown on Account in the related contact list records. So he want that when Account Record is Edited/Created then all the associated Child contacts having last name "test" will automatically gets deleted

Didnt understood? No Problem
Action Speaks More than Words


Lets try to Solve Adam's Problem-

There are 2 Solutions for that-
1) Calling a Apex Class from Process Builder to delete child record(Contact)
2) Creating a Flow to delete child record(Contact)

We are going to Implement Solution 2 in this Blog, Lets Implement it-

Lets Create Flow First-

Step 1- Go to Setup and search "Flow", then Click on Flows

Step 2- Click on New Flow and select "Record-Triggered Flow" 

Step 3- Select the Object "Account" and click on edit and enter details as below snap


Step 4- Drag the "Get Records" Component in workspace and fill the details as shown in below snap


Step 5- Join first component and second component using connecting dots

Step 6- Drag the "Workspace" Component in workspace and fill the details as shown in below snap


Step 7- Connect the dots between "Get records" and "Delete records"

Step 8-  Save your Flow and Click on Activate

Step 9- Testing of Flow
  • Create 1 Account named "Apextips"
  • Create 1 Contact having LastName = "Test"
  • Edit any field of Account, Your test contact will automatically gets deleted


Hurray......We are Done with the implementation.

Hope you Learned something New

Stay tuned for upcoming Blogs.
Thanks

Happy Learning😊


Contact:
Twitter Handle : Lakhan Meghani
Apextips Twitter handle : Apextips
linkedin :                              Lakhan Meghani 

Sunday, 7 June 2020

Send Attachments via mail and track mail Status using Conga

Hello Folks,

Hope everyone is staying safe.

Lets learn something new using CONGA COMPOSER

Usecase- I want to share contracts(PDF format) to my leads via mail and I want to  check mail status if it is opened by lead or not.

Solution-

Action Speak more than words. Checkout Demo


How to do this?
lets Follow below steps-

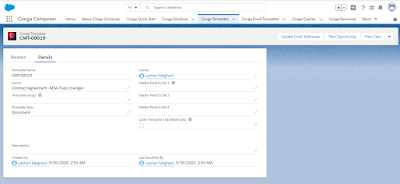
Step 1- Create Conga Email Template

Navigate Conga Email templates and click on New -> Fill the details
Refer below snap-


Now, your mail is ready, lets attach document with it.

Step 2-  Template for Document

Go to Email templates and Click on New -> Fill the details
Refer below snap-


Note: You can user standard templates available in Package or you can create your own template of document.

Now, Your mail along with attachment is ready. Lets Create Conga Solution

Step 3- Create Conga Solution

  • Click on Conga Solutions and click new
  • Give Name to your Solution and select object (In our case, it is Lead)
  • Click on Update Button
  • Click on "Access template builder" and select test record to test your solution once it is done
  • Click on "File Template" and select your template that you have created in Step 2 (Document)
  • Click on "Email template" and select your email template that you have created in step 3 (Mail Body)
  • Click on "File Template"  and select default PDF template to share your document in PDF format
  • Click on "update button"
  • Refer below snap, it should match with that-


  • Click on update button
  • Now, if you want to best this, then click and launch composer and then mail followed by send.
  • After testing, you can simply click on "Manage Page Layout". It will create your Solution name as a button on record page of Lead Object


  • Visit any lead record and click on your button
  • It will open the screen as shown below.
  • Click and "merge and mail" and then send

  • Open your mail box and check mail. You will se something like below screen-


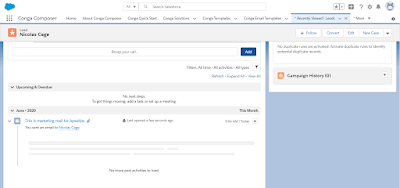
  • If you want to check whether my lead opened my mail or not
  • Click on the lead record on which you shared mail
  • Scroll down in Activity....


Hope You Get the Idea

Stay tuned for upcoming Blogs.
Thanks

Happy Learning😊


Contact:
Twitter Handle : Lakhan Meghani
Apextips Twitter handle : Apextips
linkedin :                              Lakhan Meghani 


Sunday, 10 May 2020

Render a Visual Force Page as a Excel Sheet

Hello Folks,

Hope everyone is staying safe.

In this Blog, we are going to learn- How to render Visual Force Page in Excel Sheet.

Similar to render as PDF in Visual force page, we can render Visual force Page in Excel Sheet Format. 
This converts your Page Data in Excel sheet when you Click on preview. It downloads excel sheet of your Visual Force Page.

Sunday, 3 May 2020

Social Posting on Twitter using Pardot

Hey Folks,

In this blog, we are going to learn about posting a post on twitter using Pardot.

Check this Demo


Hope you guys understood the action from demo💜

Lets Go.....and understand the steps behind that.......😀

Step 1 : Open your Pardot Org and follow below steps.

Step 2 : Now, lets connect the twitter with Pardot
Go to Pardot setting tab and click connectors. Click on Add Connectors as shown in below image.


Step 3 : By clicking on add connector, select twitter and enter further.


Step 4 : Verify added connector twitter
  • Go to Pardot Settings
  • Click Connectors
  • Click Verify button near to social connector twitter
  • It will open twittter and ask you to authorise app
  • Click on Authorise App
  • Verify this as shown in below image


Yeah, You have successfully connected Pardot with your twitter account😊

Step 5 : Make Environment ready for Posting
  • Click on Content tab and then Click Social
  • Click on New Social Post
Refer below screenshot for reference.


Step 6 : Posting on Twitter
  • Click On New Social Post
  • Select your Twitter account
  • Write Content for Post
  • Click on Send Now
Refer below image for reference


Yeah, You have Completed the Posting on Twitter using Pardot Social Connector


Hope you have learned something new😃

Stay tuned for upcoming Blogs

Happy Learning😊


Contact:
Twitter Handle : Lakhan Meghani
Apextips Twitter handle : Apextips
linkedin :                              Lakhan Meghani 


Tuesday, 28 April 2020

Override Lightning Component On a Object

Hey Folks,

In this Blog, We are going to learn - how to override a object with lightning Component.
After Achieving this, if Go to Contacts and Click on New Button, You will able to see the fields which you have added in lightning Component.

Are you Guys Curious to learn?
Lets Go........

Here is the quick Demo-


Hope you all understood what we are trying to Implement in this blog.
Lets do some Coding 💓

First Open your Developer Console -> File -> New -> Lightning Component -> fill Details and Click Submit.

--------------------------------------------------------------------------------------------------------------------------

Open your Component (yourComponentName.cmp file) and paste below Code.

<aura:component controller="tryingRecClass" implements="flexipage:availableForRecordHome,force:hasRecordId,lightning:actionOverride" access="global" >  
    <aura:attribute name="newContact" type="Contact"  default="{ 'sobjectType': 'Contact',
                                                               'First Name': '','Last Name': '','Email':'','Phone':'',}"/>
    <form>       
        <lightning:input aura:id="contactField" type="text" value="{!v.newContact.FirstName}" Name="First Name" label ="First Name"/>
        <lightning:input aura:id="contactField" type="text" value="{!v.newContact.LastName}" Name="Last Name" label ="Last Name"/>
        <lightning:input aura:id="contactField" type="email" name="email" label="Email"  value="{!v.newContact.Email}" />
        <lightning:input aura:id="contactField" type="Phone"  value="{!v.newContact.Phone}"  Name="Phone" label="Phone"/>
        <lightning:button aura:id="contactField" label="Save Contact" onclick="{!c.savecontact}"/>
    </form>
</aura:component>


--------------------------------------------------------------------------------------------------------------------------

Open your Controller (yourComponentName.js file) and paste below Code.

({
    savecontact: function(component, event, helper) {
        var newcon = component.get("v.newContact");
        var action = component.get("c.save");
        action.setParams({ 
            "con": newcon
        });
        action.setCallback(this, function(a) {
            var state = a.getState();
            if (state === "SUCCESS") {
                var name = a.getReturnValue();
                alert("success");
            }
            else
            {
                alert("Failed");
            }
        });
        $A.enqueueAction(action)
    }})

--------------------------------------------------------------------------------------------------------------------------

Now Lets Create Apex Class-

Open your Developer Console -> File -> New -> Apex Class -> fill Details and Click Ok.
Now in your class  className.apxc, paste below Code.

public class tryingRecClass {
    @AuraEnabled
    public static Contact save(contact con)
    {
     insert con;
        return con;
    }
}

--------------------------------------------------------------------------------------------------------------------------

Done with the Coding. You can also Visit on Git Repo to check code again
Now, lets override this component on our Object.
In this blog, we are going to override this component on Contacts Object.

Open your Salesforce Org. Click on Object Manager -> Select Contact Object -> Buttons, links and Actions -> Search New -> Click Edit on New


Add Lightning component from dropdown List as shown in below Image and Click Save


Hurray!
You have Successfully Override Lightning Component on Object.

Its Time to test Now💪
Go contacts and Click on New Contact. You will see something like below Image.


Try to Save the Contact and after saving check whether it is Saved in your Contact list or not!
You can find Saved Contact in your Contact List of Salesforce Org.

Hope you have learned something new😃

Stay tuned for upcoming Blogs

Happy Coding😊


Contact:
Twitter Handle : Lakhan Meghani
Apextips Twitter handle Apextips
linkedin :                            Lakhan Meghani   


Saturday, 18 April 2020

Adding Multiple Fields at a Same time in Object of Salesforce


Hello Folks,

Hope everyone is doing well.
In this blog, we are going to learn, how to add multiple fields in one time. 

Lets have a look on existing method to create a field-

Object Manager- > Select Object -> Click New -> Enter Details......

In this way, we are creating fields on any object. Such a big time consuming process to add a single fields. Isn't it ?

But what if I have a requirement that I want to add 1000 of fields on a single object? What Should I can do to do it faster?
Should I follow the existing method?
No........

Lets learn how to add multiple fields quickly 😄

Step 1 : Visit: https://fieldcreator.herokuapp.com/

Step 2 : Select the environment Production / Developer / Sandbox. In our case, we are selecting Developer.


Step 3 : Click on login and enter the credentials of your Developer Org.

Step 4 : After Login, you will See below Screen as shown in Image.

Step 5 : Verify your User Name and Click on "Query List of Objects". After clicking on that,  you will see below Screen.


Step 6 : Select Object and Add Fields as shown in Below Image.


Step 7 : Click on Deploy fields 


Step 8 : After this you will get a message "Successful deployed". 


Step 9 : Login your Salesforce Org and check whether fields are Present or not. You will find all the above created fields in your Org.


Isn't  a easy method to add multiple fields at a time? Hope you understood.

Take Tuned for Next Blogs😉

Thanks

Happy Learning😅

Contact:
Twitter Handle : Lakhan Meghani
Apextips Twitter handle Apextips
linkedin :                            Lakhan Meghani